
As much as I love cooking, on a hot day I just do not want to be in the kitchen, so it’s fair to assume the kids don’t either. But if you’re getting fed up of the hot tempers and the “I’m boreds,” then there are some quick and easy things you can make with the kids. When it’s hot, you don’t want the oven on any more than you have to, so these top five makes only require either the fridge, freezer, or microwave.
They’ll all keep the kids occupied and your temper cool, and then at the end of it you can send them off with the yummy snack they’ve made. Most of these can be made with what you likely already have in your cupboards or fridge too.
 Milkshake Cubes

Stuff You’ll Need
- Ice cube tray
- Milk
- Sprinkles, chocolate chips, broken cookies, jelly beans, (anything sweet that you can fit in an ice cube tray)
Let’s Get Going
Well, I bet you’ve figured this one out already, but it does keep the kids busy as they raid the cupboards and come up with their own fantastic milk cube concoctions. Half fill the ice cube tray with milk and then add your ingredients, top up with milk as necessary and put them in the freezer.
When they’re frozen, pop 2 or 3 of your yummy cubes in a glass of milk or milkshake, and make sure to have a spoon on hand to help your little guys scoop up the yummy bits that get left at the bottom. Sounds a little strange, but there’s only a small amount of sweetness and it’s great for their imaginations as they think about different flavour combos.
 Microwave Crisps

This is stupidly simple and much more yummy than you’d think.
Stuff You’ll Need
- 1 baking potato
- Kitchen roll
- Salt and oil (optional)
Let’s Get Going
Cut your potato in half, and begin to slice (no need to peel). I used a knife but it is tricky, if you have a slicer attachment on your food processor or you have a mandolin then definitely use that. You need to slice no thicker than 3mm (about 1/16 of an inch). This is definitely a grown-ups job, but the rest you can leave the kids to do.
Lay the slices on a double thickness of kitchen roll on a large plate. Make sure they don’t overlap. Spray or brush with oil if you wish.
Put the whole lot in the microwave (yes even including the kitchen roll–it’ll be fine) for 5 1/2 minutes.
Microwaves vary greatly, even those of the same wattage, so now you just need to keep checking on them. They’re done when they’re crispy and have no softness left–they’ll be brown in the middle too. Take out the ones that are done and continue to cook the rest, checking every 30 seconds or so. They made need up to another 3 minutes–it also depends on the potato.
Sprinkle with salt if you wish, and that’s it!
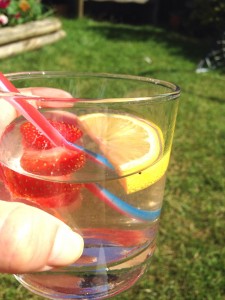 Flavoured Water

The perfect cool drink for washing down those microwave crisps/chips!
Stuff You’ll Need
- Water
- A mason or kilner jar
- A citrus fruit
- Some berry fruits (optional)
Let’s Get Going
You can cut up the citrus fruit into slices, while the kids chop or mush up the berries. Younger kids can mash with a fork and older kids can cut using a regular dinner knife.
Put your berry fruits into a clean, large jar. Fill with water about 3/4 of the way up.
Squeeze in half of the lemon juice and then put all the lemon slices in the jar. Top up with more water if needed. Leave to infuse for around 2 hours or more in the fridge.
Perfect summer drink 🙂
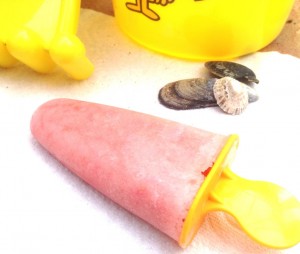 Smoothie Lollies

Healthier than ice cream and kids can have a ball choosing their favourite fruits to throw in.
We’ve gone for the classic strawberry and banana, but feel free to change it to whatever fruits you have. You can throw frozen fruit into the blender, straight from the freezer, with no problems.
Stuff You’ll Need
- One banana
- 80g (1/2 cup) of strawberries
- 120ml (1/2 cup) skimmed milk
- 120ml (1/2 cup) apple juice
- Honey (optional–summer strawberries shouldn’t need honey, but more sharp berries like raspberry might need a bit of sweet help from the bees)
Let’s Get Going
Break your banana into a few pieces and then throw it into the blender along with your other ingredients. Blitz until everything is pretty smooth.
Poor into lolly moulds and freeze. Much more tasty than a Mr. Wippy. Although if you’re in the mood for some ice cream…
 Ice Cream in a Bag

We’ve done a whole feature on this in the past, which explains more about the science of ice cream. So if you want to add a bit of learning to the process of ice cream making then click here.
Stuff You’ll Need
- 1/2 cup of milk or cream
- 1 tbsp sugar
- 1/4 teaspoon vanilla extract (or flavouring of your choice)
- 4 cups of ice
- 6 tbsp salt (any kind will do–you’re not going to be eating it)
- 2 small resealable bags, 1 large resealable bag
Let’s Get Going
Fill one of the small bags with the milk, sugar, and vanilla. Get out all of the air, seal it, and then double-bag it inside the other small bag.
Fill the large bag with the ice and then sprinkle the salt over.
Put your doubled-up small bag inside the large bag, making sure it’s surrounded by the ice/salt mix. Seal the large bag and shake, shake, shake–this is definitely the fun bit for kids!
After 5 minutes give the small bag a poke to see if it seems ready. If not then carry on shaking–it could take another 3 minutes.
Remove the small bag and wipe it down to get rid of any salt. Now you can empty it out into a bowl and enjoy 🙂
TIPS:
Use a cloth to protect your hands while shaking as it gets pretty cold after shaking for that long.
This only makes one portion (about a scoop), so if you have more kids then you’ll need to give them a set of bags each to shake.
And there we have it! Proof that cooking with the kids in summer needn’t be a hot-and-bothered experience. If you’ve enjoyed these top five things to make with the kids then please subscribe to our newsletter using the green box at the top right of the page. We’ll keep you updated with all things Mini Yummers (and nothing else–promise!).
Leave a Reply